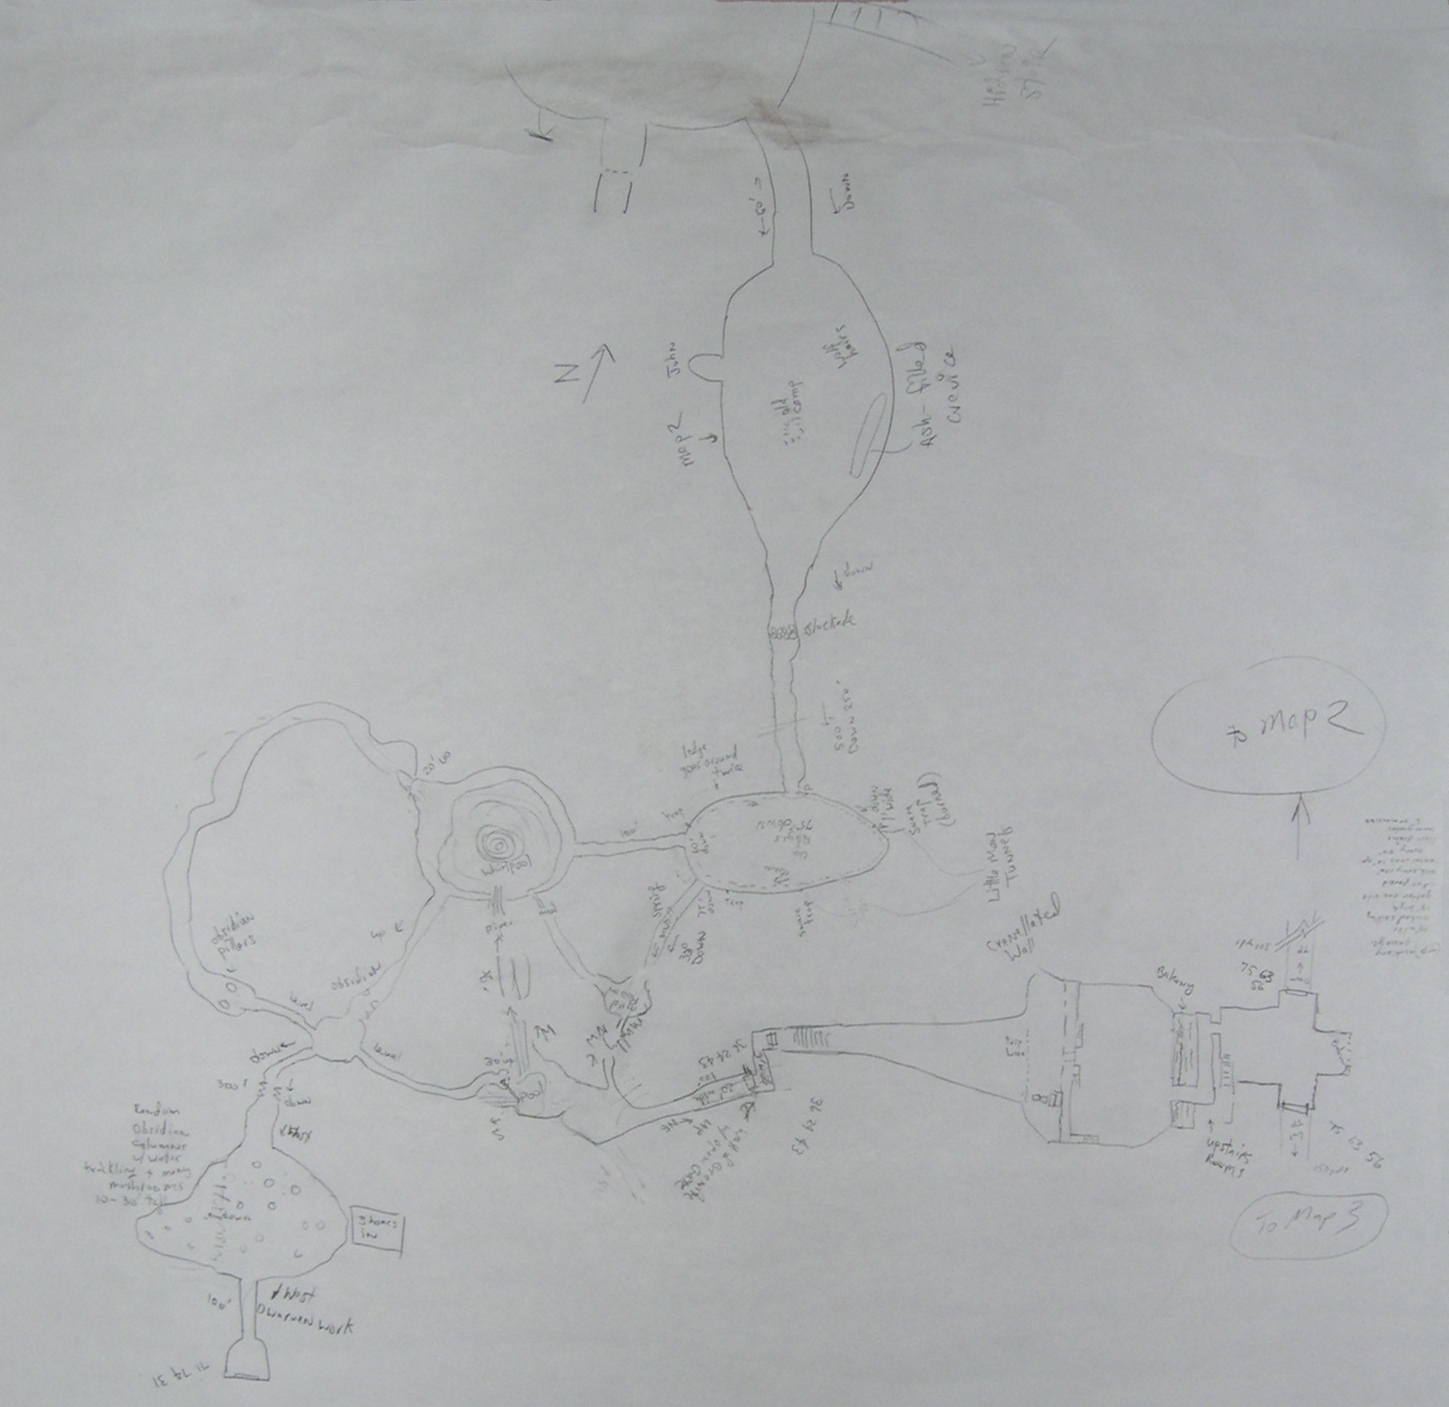
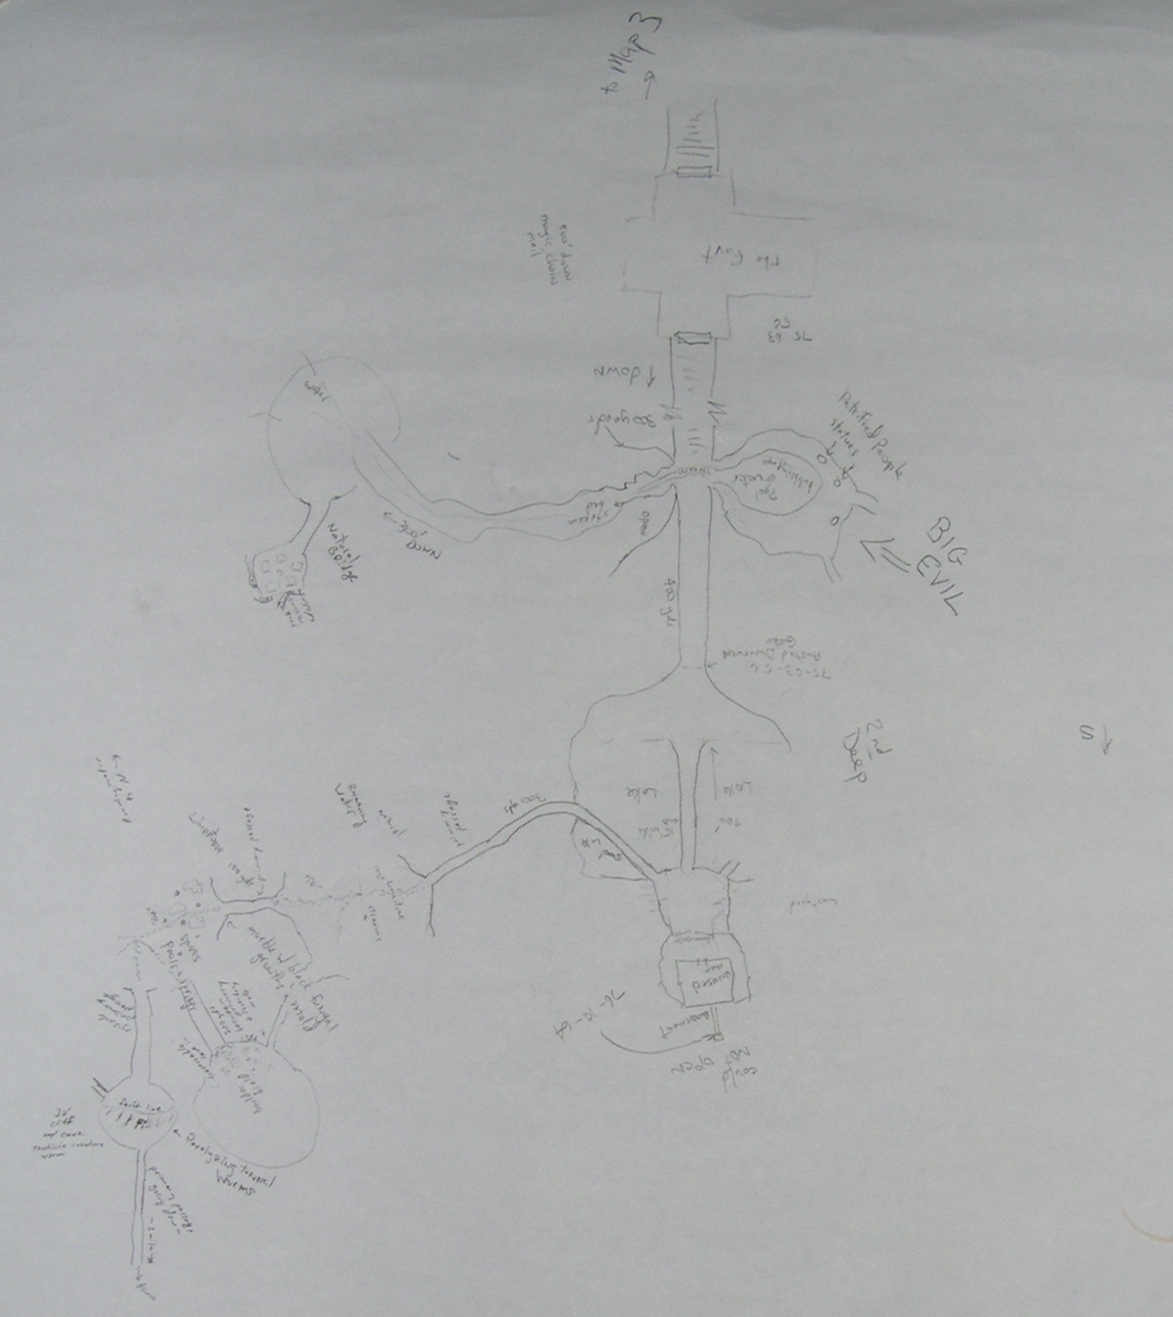
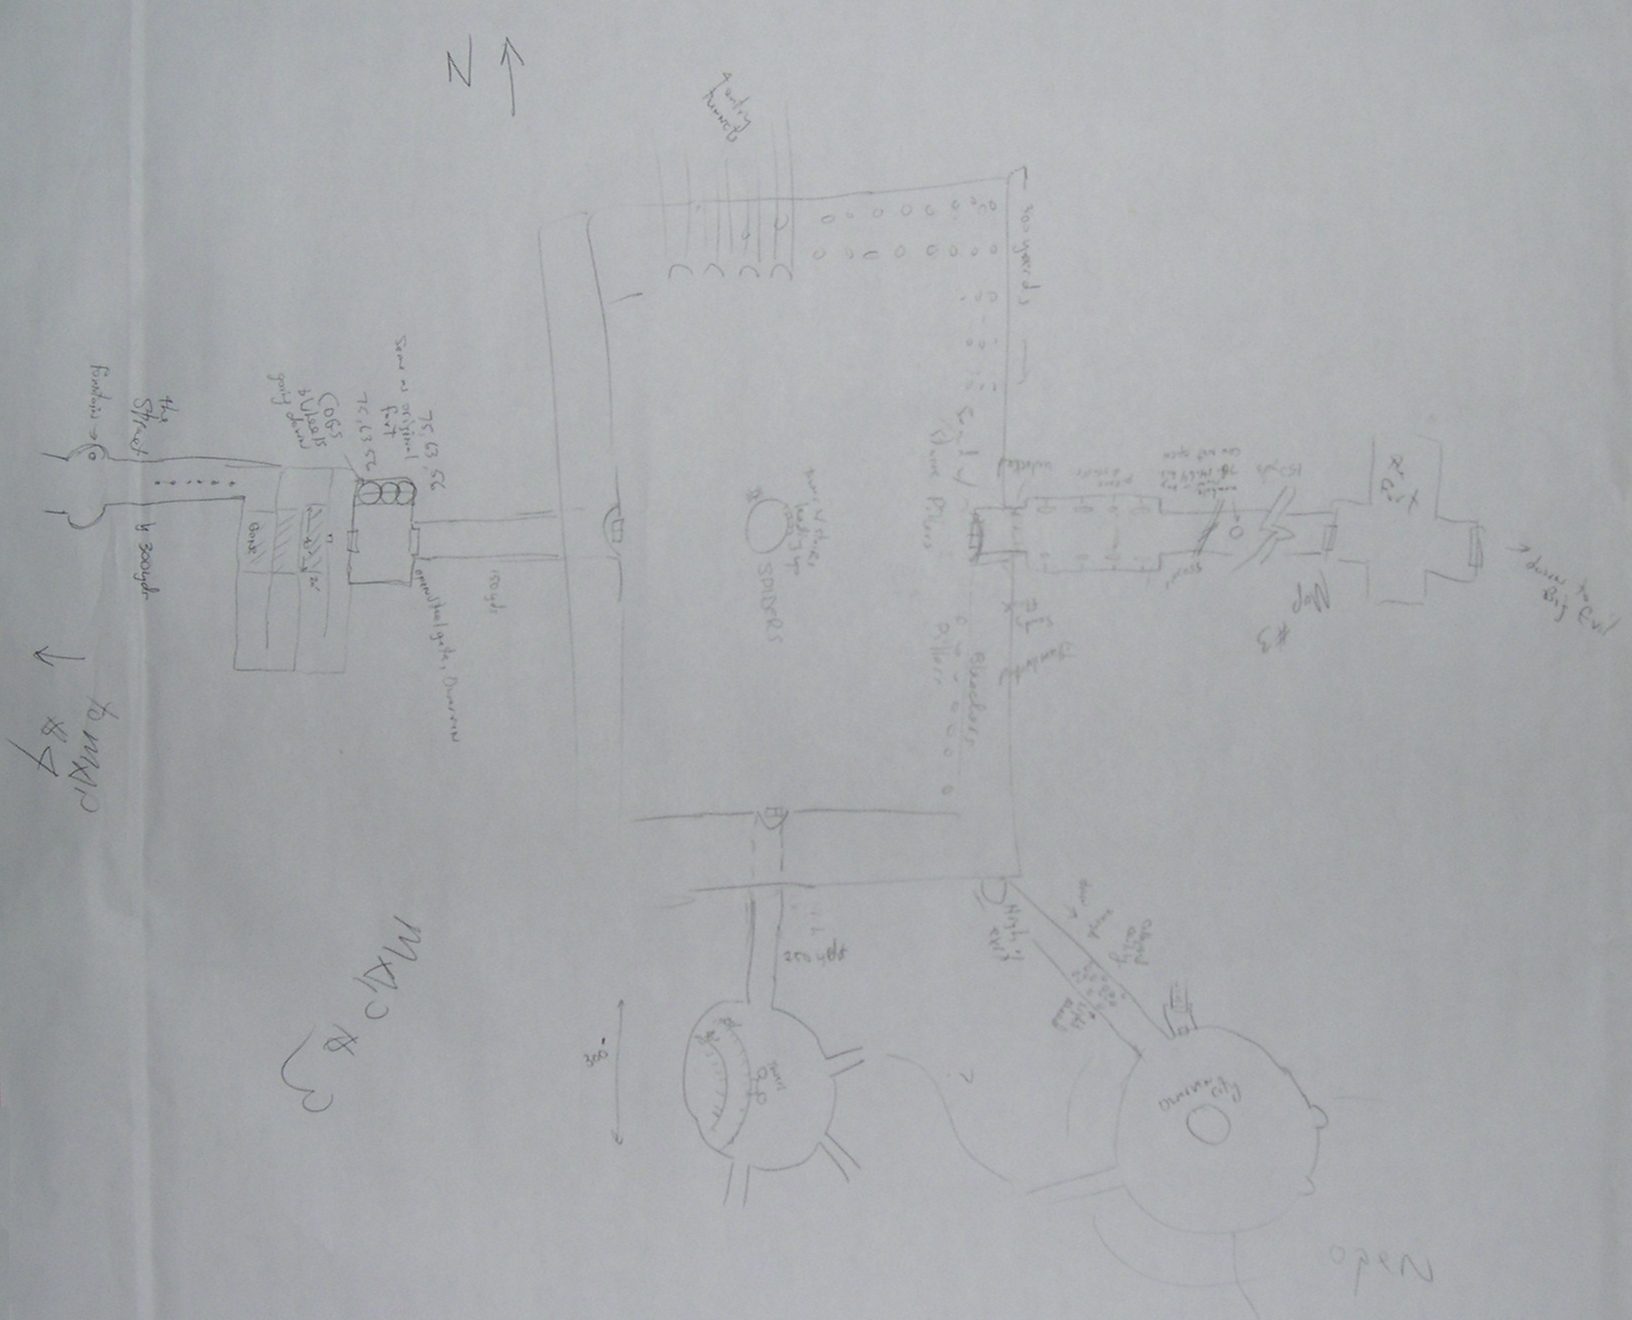
It's Saturday, and I usually don't write a regular post on the weekends, but I thought I'd throw up links to the player maps from the first session. These were done on easel-board sized paper, then photographed, so the quality isn't the best.
First Map
This map depicts the exterior entrance (top), the cavern complex (left) and the goblin fort (right). Most of this area was explored Friday night.
Second Map
This map depicts the goblin fort (top) and the passages beyond the "Big Evil" in the pool. This area is only partially explored. Most of this was explored Sunday morning.
Third Map
This map depicts the area beyond the north gate leading from the goblin fort (right). The big area in the center is the huge arena the party crossed several times during Saturday's play. Left is the switchback that lead to a miles long passage, while the bottom of the map represents the orc fort and ant colony.
PBE Games on DriveThruRPG

Showing posts with label moria. Show all posts
Showing posts with label moria. Show all posts
Saturday, February 6, 2010

Wednesday, February 3, 2010
Return to Moria: First Session Recap
The tldr for the lazy: Very successful first session with lots of encounters.
I'm writing this after spending a long day driving back from the game followed by a cold night in front of the fireplace. I got home about 7 PM Monday to discover my furnace had died while I was gone. Please bear with me if this article sounds a bit frazzled. Since you've been patient enough to read my ramblings about this campaign I thought it only fair to share the fruits of the preparation.
Friday Afternoon & Evening
After a quick bit of organizational work (we dealt with most of that before the session in email) the entire 18 man party plus two mules set off for Moria, loaded with gear, food and grain. Their intent was to first verify the map, left to Darren, Digs and Dahryl by their somewhat deranged uncle, was actually accurate, then find a secure campsite relatively close to the entry, then start their delve, leaving part of the group on watch at the base camp. The trip was relatively easy, the only sour note the sight of three or four riders shadowing the party along their route. After discovering a promising cave leading into the mountainside the party established a base camp and headed in.
The group spent the better part of a day exploring a series of natural caverns centered around a huge, watery, maelstrom in a central chamber. They ran into a pack of diminutive humanoids that set traps for them along a cliff-side trail, discovered a massive millstone door that they haven't figured out how to get past, traveled through a fungus-filled cavern, discovered a pair of skeletons beneath a pair of obsidian spires, and rescued a deranged old man who was apparently the survivor of a previous expedition. After backtracking and leaving the old man at the camp, the party finally found a (relatively) safe route to the Dwarf-made wall mentioned by the 3 D's uncle.
Further scouting by the party's thieves revealed a fortified wall occupied by goblins beyond a broad stepped passage over 200 feet long. The party, a bit itchy for action, decided to harass the wall guards to see what the reaction was. With a bit of shuffling around in the dark the party managed to get the jump on the guards, killing most of them, but not before one sounded the alarm. The party started to fall back, only to be blitzed by a pack of swift running wargs. Realizing the beasts would easily run them down, the party used their elevated position on the wall to their advantage, and made pretty short work of them. The fight delayed them long enough for the warg's handler, a bestial goblin with glove-mounted blades on his hands, to attack. They eventually killed him too, and beat a hasty retreat from the additional forces approaching across a fairly open cavern beyond the wall.
After an uneasy night at camp the party returned, intent on assaulting the remainder of the goblins. They discovered they were up against a moat protected fortification with an elevated balcony providing cover fire over most of the approach. The party started an assault, but realized they were not prepared to face a determined adversary in a fortified position and fell back. This ended Friday night's gaming.
From the GM perspective, the entry area was a bit too complex. There were quite a few physical obstacles and I think the players got a little frustrated. I had anticipated the goblins would have been defeated by the end of Friday night's play, but it was late when the party got there. The players decided not to force a major encounter when everyone was tired, which was, in retrospect, a very good choice. I also rolled exactly zero encounters for the party camped outside.
Saturday Morning
The party's first attempt at the fort was side-tracked by a group of orcs, who were waiting to ambush the party near the entrance to the fort area. After a bit of indecisiveness, the party attacked in force and wiped the orcs out in short order (all hail hold person!)
Using some clever tactics, spider climbing a fighter and cleric supported by thieves onto the balcony to take out the archers while the main force went for the main gate, they got through the defenses and pretty much wiped out the goblin force. Their leader, a tougher goblin wearing a fine shirt of Dwarven mail, challenged the party's ranger to a one on one duel, quickly knocking him unconscious. The party's paladin was going to take the next shot at him, but the others were less patient and attacked en masse. Seeing he was going to die no matter what, the goblin leader turned and jumped off the parapet, plunging over 500 feet to the cavern floor far below. The party secured the gates leading further into Moria, and searched the fort, uncovering the goblin hoard. After some debate they decided to use the fort as a base of operations and move the camp inside, uncomfortably aware that at least one goblin had escaped the fight. The party also left their mules in the care of the crazy old man they rescued from the caverns above. Apparently he was able to communicate with them somehow.
The rest of the morning was spent securing the fort and exploring beyond the two gates leading further into the depths. The south gate led to a cavern with a huge bubbling pool in the center. A pair of frog-like humanoids retreated into this pool after being surprised by the group, and the paladin spotted something very large and EVIL in the depths. That, combined with the trio of exceedingly lifelike 'statues' near the pool's edge convinced the party they should go the other way, at least for now.
The other gate led to a stable or stall area, where the party found the remains of three dead creatures, an over-sized wild boar (long dead), an orc skeleton, and a tiny elven figure with lime-green spots all over its skin. Beyond was a huge arena-like area with bleachers around the periphery. Several passages led away from this area and the party followed several, discovering a complex of residences and workshops taken over by a giant ant colony (which almost lead to a huge fight), a fortress held by more orcs, and a switchback descent guarded by iron drawbridges that led to a miles long passage leading further into the depths.
GM notes: Hero points saved at least three character lives during last night's and this morning's battles. We use a deadly critical hits chart, and the players all used hero points to avoid getting hit by one. The goblin fight was a tough one, but the players did a great job of coming up with a plan and actually implementing it.
Saturday PM
The party spent some time arguing their next steps. Some wanted to explore further, others wanted to clear out the ant colony, while another group wanted to hit the orc-held fort. Eventually the third group prevailed, leading to a major battle. The fort consisted of a pair of walls surrounding an inner bailey, the inner higher than the outer. A stone bridge led from the top of the outer wall to a barred gate that gave access to the inner bailey. There was also a heavy timber in place that connected the two walls.
The party managed to stealth some members to good firing positions outside the wall, then began the assault. Surprisingly most of the orcs retreated, releasing wargs to attack the party as they tried to penetrate the gates. With the party's primary combatants tied up with the wargs, the thieves and clerics were free to engage in the prime activity of the night, falling off high spots. No fewer than five characters plunged off the walls at various times, and the party's many clerics (six total) were kept busy keeping people alive. Even the poor halfling thief managed to fall off the same wall no fewer than three times.
Eventually the party defeated the defenders, but not before they discovered the wargs were actually some sort of demi-human/wolf shape-shifters. They also encountered a gaunt and pallid human who had the ability to form weapons from his hands and fold himself into the shadows and move without being seen. At least one of the orcs disappeared beyond the interior gates, and the party, pretty banged up and almost out of spells, decided to retreat. On the way back they ran into a lone Dwarf with an obsidian staff who pretty much ignored them and disappeared into the darkness. Back at camp the night's rest was disturbed by a weird black blob-creature that disappeared in a cloud of rainbow light when slain (?).
From the GM point of view the afternoon dragged a bit. The party got a bit tied up figuring out where to go and what to do, wasting about an hour before deciding to hit the orc fort. One of the hazards of such long sessions is we tend to not take breaks when we should and people get tired and grumpy. The fight at the fort was both hilarious and overly long. We all had a cold streak on dice and spent a couple rounds missing each other. Everyone falling off the beam between the walls was really funny, especially when the cleric actually saved someone by breaking their fall with their own body. The folding man really threw the party for a loop too. At the end of the fort fight everyone was done for the night, so we took the rest of the night off to socialize.
Sunday AM
Sunday sessions are generally short, as everyone generally heads for home around noon. The party bypassed the 'pool of evil' and explored the tunnels beyond, discovering a huge lake-filled cavern with yet another fortress within, a collapsed cavern full of rubble, and a nest of carrion crawlers, which they easily defeated. When they explored the nest they discovered a paralyzed but still-living Dwarf among the victims and rescued him.
Backtracking they eventually found a natural granite shelf leading out and down into the gigantic cavern beneath the original goblin fort. They wanted to recover the nice mail shirt the goblin leader took with him so they followed this down to a hilltop covered in ruins. A pack of undead Dwarves jumped them among the ruins, leading to the final big battle of the game. With so many clerics and two paladins the party managed to kill many of the undead with those turned revealing several paths down into the cavern below. A search of the ruins turned up a very nice stash of coins and several magic items, leftovers from a previous expedition slain by the undead.
With time running out the group retreated all the way back out of the depths and headed back to town to cash in their loot. When they returned to their original base camp they discovered the old man and their mules had vanished (hey, what do you expect if you leave your stuff in the hands of a madman?) The trip back to Hollin was uneventful, and everyone returned alive.
GM notes: Everyone lived. Not one party death. Clearly I need to step up the deadly factor a bit. Combats with 12-18 characters are SLOW, even with a relatively quick system like 1st edition. I think the players are likely to reduce the active characters in use next time we play.
Final Thoughts
Reading back over this, it doesn't seem like we did much, but that might be deceiving. Some of the encounters were huge. The goblin fort, for example, was protected by over 60 goblins and wargs. The fight there ended up being three or four separate encounters. This group is big on tactical challenges, and I accommodate them, so even simple encounters tend to be pretty deep when it comes to the actual battle.
My only disappointment with the game was that I didn't get to expand on the story elements touched on in the game. It's kind of a mixed blessing in that I have plenty of material ready for next time, but I think the story people in the group felt the lack. Hopefully I can address that next time.
I view the game as a real success. It was initially proposed as a one shot game, and by the end of the weekend everyone was talking about 'next time'. One player suggested everyone chip in some cash to defray my travel costs so they could play more often (they're all in the greater Washington DC area, I'm in Indiana). With that kind of enthusiasm, I can't wait to play again.
I'm writing this after spending a long day driving back from the game followed by a cold night in front of the fireplace. I got home about 7 PM Monday to discover my furnace had died while I was gone. Please bear with me if this article sounds a bit frazzled. Since you've been patient enough to read my ramblings about this campaign I thought it only fair to share the fruits of the preparation.
Friday Afternoon & Evening
After a quick bit of organizational work (we dealt with most of that before the session in email) the entire 18 man party plus two mules set off for Moria, loaded with gear, food and grain. Their intent was to first verify the map, left to Darren, Digs and Dahryl by their somewhat deranged uncle, was actually accurate, then find a secure campsite relatively close to the entry, then start their delve, leaving part of the group on watch at the base camp. The trip was relatively easy, the only sour note the sight of three or four riders shadowing the party along their route. After discovering a promising cave leading into the mountainside the party established a base camp and headed in.
The group spent the better part of a day exploring a series of natural caverns centered around a huge, watery, maelstrom in a central chamber. They ran into a pack of diminutive humanoids that set traps for them along a cliff-side trail, discovered a massive millstone door that they haven't figured out how to get past, traveled through a fungus-filled cavern, discovered a pair of skeletons beneath a pair of obsidian spires, and rescued a deranged old man who was apparently the survivor of a previous expedition. After backtracking and leaving the old man at the camp, the party finally found a (relatively) safe route to the Dwarf-made wall mentioned by the 3 D's uncle.
Further scouting by the party's thieves revealed a fortified wall occupied by goblins beyond a broad stepped passage over 200 feet long. The party, a bit itchy for action, decided to harass the wall guards to see what the reaction was. With a bit of shuffling around in the dark the party managed to get the jump on the guards, killing most of them, but not before one sounded the alarm. The party started to fall back, only to be blitzed by a pack of swift running wargs. Realizing the beasts would easily run them down, the party used their elevated position on the wall to their advantage, and made pretty short work of them. The fight delayed them long enough for the warg's handler, a bestial goblin with glove-mounted blades on his hands, to attack. They eventually killed him too, and beat a hasty retreat from the additional forces approaching across a fairly open cavern beyond the wall.
After an uneasy night at camp the party returned, intent on assaulting the remainder of the goblins. They discovered they were up against a moat protected fortification with an elevated balcony providing cover fire over most of the approach. The party started an assault, but realized they were not prepared to face a determined adversary in a fortified position and fell back. This ended Friday night's gaming.
From the GM perspective, the entry area was a bit too complex. There were quite a few physical obstacles and I think the players got a little frustrated. I had anticipated the goblins would have been defeated by the end of Friday night's play, but it was late when the party got there. The players decided not to force a major encounter when everyone was tired, which was, in retrospect, a very good choice. I also rolled exactly zero encounters for the party camped outside.
Saturday Morning
The party's first attempt at the fort was side-tracked by a group of orcs, who were waiting to ambush the party near the entrance to the fort area. After a bit of indecisiveness, the party attacked in force and wiped the orcs out in short order (all hail hold person!)
Using some clever tactics, spider climbing a fighter and cleric supported by thieves onto the balcony to take out the archers while the main force went for the main gate, they got through the defenses and pretty much wiped out the goblin force. Their leader, a tougher goblin wearing a fine shirt of Dwarven mail, challenged the party's ranger to a one on one duel, quickly knocking him unconscious. The party's paladin was going to take the next shot at him, but the others were less patient and attacked en masse. Seeing he was going to die no matter what, the goblin leader turned and jumped off the parapet, plunging over 500 feet to the cavern floor far below. The party secured the gates leading further into Moria, and searched the fort, uncovering the goblin hoard. After some debate they decided to use the fort as a base of operations and move the camp inside, uncomfortably aware that at least one goblin had escaped the fight. The party also left their mules in the care of the crazy old man they rescued from the caverns above. Apparently he was able to communicate with them somehow.
The rest of the morning was spent securing the fort and exploring beyond the two gates leading further into the depths. The south gate led to a cavern with a huge bubbling pool in the center. A pair of frog-like humanoids retreated into this pool after being surprised by the group, and the paladin spotted something very large and EVIL in the depths. That, combined with the trio of exceedingly lifelike 'statues' near the pool's edge convinced the party they should go the other way, at least for now.
The other gate led to a stable or stall area, where the party found the remains of three dead creatures, an over-sized wild boar (long dead), an orc skeleton, and a tiny elven figure with lime-green spots all over its skin. Beyond was a huge arena-like area with bleachers around the periphery. Several passages led away from this area and the party followed several, discovering a complex of residences and workshops taken over by a giant ant colony (which almost lead to a huge fight), a fortress held by more orcs, and a switchback descent guarded by iron drawbridges that led to a miles long passage leading further into the depths.
GM notes: Hero points saved at least three character lives during last night's and this morning's battles. We use a deadly critical hits chart, and the players all used hero points to avoid getting hit by one. The goblin fight was a tough one, but the players did a great job of coming up with a plan and actually implementing it.
Saturday PM
The party spent some time arguing their next steps. Some wanted to explore further, others wanted to clear out the ant colony, while another group wanted to hit the orc-held fort. Eventually the third group prevailed, leading to a major battle. The fort consisted of a pair of walls surrounding an inner bailey, the inner higher than the outer. A stone bridge led from the top of the outer wall to a barred gate that gave access to the inner bailey. There was also a heavy timber in place that connected the two walls.
The party managed to stealth some members to good firing positions outside the wall, then began the assault. Surprisingly most of the orcs retreated, releasing wargs to attack the party as they tried to penetrate the gates. With the party's primary combatants tied up with the wargs, the thieves and clerics were free to engage in the prime activity of the night, falling off high spots. No fewer than five characters plunged off the walls at various times, and the party's many clerics (six total) were kept busy keeping people alive. Even the poor halfling thief managed to fall off the same wall no fewer than three times.
Eventually the party defeated the defenders, but not before they discovered the wargs were actually some sort of demi-human/wolf shape-shifters. They also encountered a gaunt and pallid human who had the ability to form weapons from his hands and fold himself into the shadows and move without being seen. At least one of the orcs disappeared beyond the interior gates, and the party, pretty banged up and almost out of spells, decided to retreat. On the way back they ran into a lone Dwarf with an obsidian staff who pretty much ignored them and disappeared into the darkness. Back at camp the night's rest was disturbed by a weird black blob-creature that disappeared in a cloud of rainbow light when slain (?).
From the GM point of view the afternoon dragged a bit. The party got a bit tied up figuring out where to go and what to do, wasting about an hour before deciding to hit the orc fort. One of the hazards of such long sessions is we tend to not take breaks when we should and people get tired and grumpy. The fight at the fort was both hilarious and overly long. We all had a cold streak on dice and spent a couple rounds missing each other. Everyone falling off the beam between the walls was really funny, especially when the cleric actually saved someone by breaking their fall with their own body. The folding man really threw the party for a loop too. At the end of the fort fight everyone was done for the night, so we took the rest of the night off to socialize.
Sunday AM
Sunday sessions are generally short, as everyone generally heads for home around noon. The party bypassed the 'pool of evil' and explored the tunnels beyond, discovering a huge lake-filled cavern with yet another fortress within, a collapsed cavern full of rubble, and a nest of carrion crawlers, which they easily defeated. When they explored the nest they discovered a paralyzed but still-living Dwarf among the victims and rescued him.
Backtracking they eventually found a natural granite shelf leading out and down into the gigantic cavern beneath the original goblin fort. They wanted to recover the nice mail shirt the goblin leader took with him so they followed this down to a hilltop covered in ruins. A pack of undead Dwarves jumped them among the ruins, leading to the final big battle of the game. With so many clerics and two paladins the party managed to kill many of the undead with those turned revealing several paths down into the cavern below. A search of the ruins turned up a very nice stash of coins and several magic items, leftovers from a previous expedition slain by the undead.
With time running out the group retreated all the way back out of the depths and headed back to town to cash in their loot. When they returned to their original base camp they discovered the old man and their mules had vanished (hey, what do you expect if you leave your stuff in the hands of a madman?) The trip back to Hollin was uneventful, and everyone returned alive.
GM notes: Everyone lived. Not one party death. Clearly I need to step up the deadly factor a bit. Combats with 12-18 characters are SLOW, even with a relatively quick system like 1st edition. I think the players are likely to reduce the active characters in use next time we play.
Final Thoughts
Reading back over this, it doesn't seem like we did much, but that might be deceiving. Some of the encounters were huge. The goblin fort, for example, was protected by over 60 goblins and wargs. The fight there ended up being three or four separate encounters. This group is big on tactical challenges, and I accommodate them, so even simple encounters tend to be pretty deep when it comes to the actual battle.
My only disappointment with the game was that I didn't get to expand on the story elements touched on in the game. It's kind of a mixed blessing in that I have plenty of material ready for next time, but I think the story people in the group felt the lack. Hopefully I can address that next time.
I view the game as a real success. It was initially proposed as a one shot game, and by the end of the weekend everyone was talking about 'next time'. One player suggested everyone chip in some cash to defray my travel costs so they could play more often (they're all in the greater Washington DC area, I'm in Indiana). With that kind of enthusiasm, I can't wait to play again.
Friday, January 29, 2010
Return to Moria: Let the Game Begin
By now my trek across the tundra to run this game should be complete and the game should be underway (assuming there wasn't a blizzard or something, in which case I might be dead along the road somewhere). Hopefully I'll have a report on how the game went written up sometime next week.
I won't be checking comments or email for a few days here, so please bear with me if you're expecting a response.
I won't be checking comments or email for a few days here, so please bear with me if you're expecting a response.
Thursday, January 28, 2010
Return to Moria: Experience
There have been a few recent blog posts concerning experience points in the campaign recently, this one from Jeff's Gameblog, and this and this from The Tao of D&D. Here's how I'm handling experience in Moria.
XP for Treasure
I'm using 1 XP = 1 GP for treasure recovered from the dungeon. There are some pretty nice stacks of coin hidden away in the Mines, almost all of it protected by something mean and nasty. I figure Moria has been empty for a long time, so any wealth, unless it was very well protected, has long since been redistributed. XP for treasure is handed out only after it's safely returned to civilization, in this case the town of Hollin. This might sound a bit arbitrary, but it makes for some interesting choices for the players. Who goes back to town, what do you do with the treasure once it's there, and who stays behind to guard it suddenly become tough questions.
XP for Killing Things
For monster-slaying I use a version of the 1st Edition D&D experience value calculations. For this game I'm awarding accelerated experience so the numbers have been tweaked up a bit. I don't do adjustments for individual hit points; to be honest I don't really do individual HP in most cases. I have a cheat sheet listing each creature's XP value and a simple spreadsheet to plug in numbers killed for a quick total calculation. I have my laptop at the table (since all my notes are in TiddlyWiki). It takes about ten seconds to plug in kills and come up with an XP total. Kill XP is awarded at the end of combat and is split by everyone involved in the fight. On the low end sub 1-HD creatures are worth maybe 20 XP, on the upper end, well there's a unique creature in Moria that's worth about 12,000 XP right now.
XP for Completing Encounters
I give an XP bonus for completing encounters during the course of play. Completing might mean killing all the goblins, but it could also mean negotiating passage through their stronghold or getting them involved in a conflict with the neighboring trolls so the party can slip in and loot their camp. I base this on the potential threat and hostility of the encounter. This XP is sort of a "discretionary fund" and I'll admit to using it as a reward for play that I find entertaining (the GM is there to have fun too!) This XP is awarded on the spot, and is split between everyone who helped complete the encounter, so all characters involved in a multi-attack plan, for example, would receive a share.
The relative amounts of the three types of experience are weighed toward loot, then kills, then encounters. Loot first, because it allows clever play to bypass risk for immediate gain. Kills, because my players like combat, and encounters, because hey, I have needs too. I've used this system in the past and it's worked well. It probably sounds more complex than it is.
It's likely any responses to this post will be delayed, since I'm actually driving from Indiana to Virginia today for this game.
XP for Treasure
I'm using 1 XP = 1 GP for treasure recovered from the dungeon. There are some pretty nice stacks of coin hidden away in the Mines, almost all of it protected by something mean and nasty. I figure Moria has been empty for a long time, so any wealth, unless it was very well protected, has long since been redistributed. XP for treasure is handed out only after it's safely returned to civilization, in this case the town of Hollin. This might sound a bit arbitrary, but it makes for some interesting choices for the players. Who goes back to town, what do you do with the treasure once it's there, and who stays behind to guard it suddenly become tough questions.
XP for Killing Things
For monster-slaying I use a version of the 1st Edition D&D experience value calculations. For this game I'm awarding accelerated experience so the numbers have been tweaked up a bit. I don't do adjustments for individual hit points; to be honest I don't really do individual HP in most cases. I have a cheat sheet listing each creature's XP value and a simple spreadsheet to plug in numbers killed for a quick total calculation. I have my laptop at the table (since all my notes are in TiddlyWiki). It takes about ten seconds to plug in kills and come up with an XP total. Kill XP is awarded at the end of combat and is split by everyone involved in the fight. On the low end sub 1-HD creatures are worth maybe 20 XP, on the upper end, well there's a unique creature in Moria that's worth about 12,000 XP right now.
XP for Completing Encounters
I give an XP bonus for completing encounters during the course of play. Completing might mean killing all the goblins, but it could also mean negotiating passage through their stronghold or getting them involved in a conflict with the neighboring trolls so the party can slip in and loot their camp. I base this on the potential threat and hostility of the encounter. This XP is sort of a "discretionary fund" and I'll admit to using it as a reward for play that I find entertaining (the GM is there to have fun too!) This XP is awarded on the spot, and is split between everyone who helped complete the encounter, so all characters involved in a multi-attack plan, for example, would receive a share.
The relative amounts of the three types of experience are weighed toward loot, then kills, then encounters. Loot first, because it allows clever play to bypass risk for immediate gain. Kills, because my players like combat, and encounters, because hey, I have needs too. I've used this system in the past and it's worked well. It probably sounds more complex than it is.
It's likely any responses to this post will be delayed, since I'm actually driving from Indiana to Virginia today for this game.
Tuesday, January 26, 2010
Return to Moria: House Rules
My Return to Moria game is hewing pretty closely to 1st Edition AD&D rules, but we're adding a number of house rules to add our own flavor to the game. Here they are:
Attribute Checks
Certain situations call for the use of a specific character attribute. We've always used a 'd20 roll under' system for attribute checks in our games. This time I'm flipping it and using an attribute + d20 roll. This allows me to keep my notes a bit neater, flips a roll under mechanic to a roll over, and doesn't really change the results.
THAC0
We're using 2nd edition THAC0 rules. Everyone at the table is familiar with it and it saves me some table searching.
Critical Hits and Fumbles
Any natural one rolled is a fumble and will be rolled on the fumble results table. Any natural roll of 20 is rerolled, and if the second roll hits, the result will be rolled on the critical hits table. We use a second roll to increase the difficulty of critical hits due to the rather unpleasant nature of our house critical table, which divides result by damage type. An example result (roll of 84):
Hero Points
Each player (not character) gets a number of tokens at the beginning of the game, and at various points during the game (typically after an encounter completed). These tokens can be spent to achieve specific results in game. One token spent grants:
Hit Points and Death
Characters are fully effective until they reach zero hit points, which renders them unconscious. Characters are slain if their hit points drop to negative constitution. Characters regain consciousness whenever their hit points rise above zero.
Spell Books
Spell books are unique artifacts, created by each magic user to house their encoded understanding of magical spells. They are generally high quality books with dozens of pages and can hold up to 30 spell inscriptions. Spell books are somewhat large and bulky (think encyclopedia volume), and magic users should pack light to allow their spell book to fit into their 'backpack' encumbrance.
Each magic user must decide if they are going to risk their spell book in the dungeon. Spell books are subject to damage, which might cause irreplaceable loss of spells. Specifically if the player suffers an elemental attack and fails their saving throw the spell book will be tested for damage. Swimming (or drowning) might also cause damage. Spell books might be stolen or taken by intelligent foes. The flip side is a magic user cannot recover any spells without their spell book. Note that magic users may attempt to copy a spell from another magic user's spell book, but they cannot memorize a spell directly from its pages (no sharing spell books for memorization).
A new, blank spell book costs 500 GP in materials and takes a week of constant work and ritual to properly prepare.
Spell Copying
Spell copying allows magic users to share or exchange spells, or learn new spells from arcane sources (scrolls typically).
Since I'm not forcing the 100 gp gem material component, here's how Identify works:
So there you have it, our house rules. I'm probably missing something in this list, but it should be pretty complete. Nothing too bizarre or unusual (or at least I don't think so), but maybe some of you have different opinions.
On a final related, but different note, a quick print preview with all tiddlers open in my Return to Moria working file shows I have about 275 pages of campaign material written. Over preparation for the win (again). One day I'll learn to either prep less material or leave out some details.
Attribute Checks
Certain situations call for the use of a specific character attribute. We've always used a 'd20 roll under' system for attribute checks in our games. This time I'm flipping it and using an attribute + d20 roll. This allows me to keep my notes a bit neater, flips a roll under mechanic to a roll over, and doesn't really change the results.
THAC0
We're using 2nd edition THAC0 rules. Everyone at the table is familiar with it and it saves me some table searching.
Critical Hits and Fumbles
Any natural one rolled is a fumble and will be rolled on the fumble results table. Any natural roll of 20 is rerolled, and if the second roll hits, the result will be rolled on the critical hits table. We use a second roll to increase the difficulty of critical hits due to the rather unpleasant nature of our house critical table, which divides result by damage type. An example result (roll of 84):
- Slash - large slab of meat carved from leg, 3x damage, half movement, roll DEX or fall for 1d3 rounds
- Crush - masterful display results in normal damage, but dazzles target, they lose 1 round
- Pierce - weapon pierces and entangles guts, normal damage, subsequent attacks do additional 1d4 yanking damage
Hero Points
Each player (not character) gets a number of tokens at the beginning of the game, and at various points during the game (typically after an encounter completed). These tokens can be spent to achieve specific results in game. One token spent grants:
- +1 (+5%) to a single die roll (to hit, damage, or save for example) The cost of affecting any single die roll doubles beyond 1st: +2 costs two, +3 costs four, +4 costs eight, etc.
- Force an opponent to re-roll a single die roll (to hit, damage, save, etc.)
- Exchange for 100 XP / level of the character gaining the XP.
- A free use of a charged or use per day magic item (does not include potions, scrolls, or other consumable items).
- Gain a free non-combat action in a combat round.
Hit Points and Death
Characters are fully effective until they reach zero hit points, which renders them unconscious. Characters are slain if their hit points drop to negative constitution. Characters regain consciousness whenever their hit points rise above zero.
Spell Books
Spell books are unique artifacts, created by each magic user to house their encoded understanding of magical spells. They are generally high quality books with dozens of pages and can hold up to 30 spell inscriptions. Spell books are somewhat large and bulky (think encyclopedia volume), and magic users should pack light to allow their spell book to fit into their 'backpack' encumbrance.
Each magic user must decide if they are going to risk their spell book in the dungeon. Spell books are subject to damage, which might cause irreplaceable loss of spells. Specifically if the player suffers an elemental attack and fails their saving throw the spell book will be tested for damage. Swimming (or drowning) might also cause damage. Spell books might be stolen or taken by intelligent foes. The flip side is a magic user cannot recover any spells without their spell book. Note that magic users may attempt to copy a spell from another magic user's spell book, but they cannot memorize a spell directly from its pages (no sharing spell books for memorization).
A new, blank spell book costs 500 GP in materials and takes a week of constant work and ritual to properly prepare.
Spell Copying
Spell copying allows magic users to share or exchange spells, or learn new spells from arcane sources (scrolls typically).
- One attempt is allowed per day.
- Scrolls are destroyed by a copy attempt, successful or not. Spellbooks are not.
- Each attempt takes one hour per spell level.
- Each spell can be attempted once per character level, no matter the source.
- Chance to know (INT based from PHB) determines copy success.
- Attempting to copy a spell you can't cast yet suffers a penalty of 5% / level difference (required level to use vs. caster level).
Since I'm not forcing the 100 gp gem material component, here's how Identify works:
- It can only be cast on an item once per day.
- When cast there is a INT x 5% chance of revealing one characteristic of the item.
- Having an appropriate LORE adds 15% to the chance of revealing a characteristic.
- The caster suffers any potential ill effects from an item when casting this spell.
- Normal 'try it and see' methods can be used as well.
So there you have it, our house rules. I'm probably missing something in this list, but it should be pretty complete. Nothing too bizarre or unusual (or at least I don't think so), but maybe some of you have different opinions.
On a final related, but different note, a quick print preview with all tiddlers open in my Return to Moria working file shows I have about 275 pages of campaign material written. Over preparation for the win (again). One day I'll learn to either prep less material or leave out some details.
Friday, January 8, 2010
Return to Moria: Lost in the Maze
It's been a while since I've posted anything about my Moria game, so I thought an update was in order.
Characters
The holidays threw a wrench into my schedule so there was a lull in my side of the process. Most of my players had some time off over the holidays, so everyone has finalized their characters. We've also done a bit of preparation via email, so everyone knows a bit about the locale. The group has discussed their clues and potential entrances to Moria, and have determined they're going to follow the map the trio of orphans from up north received from their uncle. From my perspective, the character side of things is pretty well done, a good thing, since there's a lot left for me to do elsewhere.
Maps
I've finished off all the broad scale maps of Moria. These reflect each level of the mines in broad strokes and provide a framework of connectivity and general layout. I posted up a sample of this style of map here. My mapping work is now focused on two separate tasks:
Area Descriptions and Encounters
This is where my activities are really focused now. With a firm commitment from the players on their entry point, I've been able to buckle down and start creating content. After a bit of flailing about with some standard templates for TiddlyWiki I've finally started making progress. I've mapped out the three 'levels' surrounding the party's chosen entrance in preparation for their arrival, and I plan on expanding this coverage over the next couple of weeks.
The problem I'm facing now is with sprawl. There are four additional levels connected to the area I've already mapped, and each of those levels leads to four or five other levels. I'm planning on taking an organic approach and expanding the coverage in all directions as the mood strikes. If the players choose to fully explore the area I've already mapped I have plenty of material for the first weekend session, but players never do what you want. I'm sure they'll go haring off into undefined areas within a couple hours of play.
Speaking of sessions, readers might be thinking this is an awful lot of prep work for a single session game. I should probably explain. The group I'm running this for consists of people I've gamed with for many years (in some cases 30+ years). We're now scattered from Indiana to Maryland, so we only get to game together a couple times a year, and the sessions are weekend-long affairs lasting from Friday afternoon til mid-day Sunday. We probably pack in 6-7 'normal' sessions during these games. Even with a minimalist approach to prep there's a substantial amount of stuff to get ready, and I'm not really a minimalist on the preparation front.
Yeah, I'm sweating a bit.
Characters
The holidays threw a wrench into my schedule so there was a lull in my side of the process. Most of my players had some time off over the holidays, so everyone has finalized their characters. We've also done a bit of preparation via email, so everyone knows a bit about the locale. The group has discussed their clues and potential entrances to Moria, and have determined they're going to follow the map the trio of orphans from up north received from their uncle. From my perspective, the character side of things is pretty well done, a good thing, since there's a lot left for me to do elsewhere.
Maps
I've finished off all the broad scale maps of Moria. These reflect each level of the mines in broad strokes and provide a framework of connectivity and general layout. I posted up a sample of this style of map here. My mapping work is now focused on two separate tasks:
- Geomorphs - I've been sketching out general purpose mini-maps for use and reuse throughout the session. These maps include stuff like variations on clan halls, defensive works, mines and tunnels, and similar common features.
- Singular maps - These are maps of one shot areas, unique locations that need a map to clarify the layout. I'm trying to minimize these as Moria is huge. Doing unique maps of every area is a near impossible task.
Area Descriptions and Encounters
This is where my activities are really focused now. With a firm commitment from the players on their entry point, I've been able to buckle down and start creating content. After a bit of flailing about with some standard templates for TiddlyWiki I've finally started making progress. I've mapped out the three 'levels' surrounding the party's chosen entrance in preparation for their arrival, and I plan on expanding this coverage over the next couple of weeks.
The problem I'm facing now is with sprawl. There are four additional levels connected to the area I've already mapped, and each of those levels leads to four or five other levels. I'm planning on taking an organic approach and expanding the coverage in all directions as the mood strikes. If the players choose to fully explore the area I've already mapped I have plenty of material for the first weekend session, but players never do what you want. I'm sure they'll go haring off into undefined areas within a couple hours of play.
Speaking of sessions, readers might be thinking this is an awful lot of prep work for a single session game. I should probably explain. The group I'm running this for consists of people I've gamed with for many years (in some cases 30+ years). We're now scattered from Indiana to Maryland, so we only get to game together a couple times a year, and the sessions are weekend-long affairs lasting from Friday afternoon til mid-day Sunday. We probably pack in 6-7 'normal' sessions during these games. Even with a minimalist approach to prep there's a substantial amount of stuff to get ready, and I'm not really a minimalist on the preparation front.
Yeah, I'm sweating a bit.
Wednesday, December 2, 2009
Return to Moria: Status Report
In my last post about my upcoming Moria-based campaign I talked about the three main tasks I was pursuing at the time, character creation, mapping, and encounters. The last two weeks have seen some good progress on all three fronts (my players keep out).
Characters
All my players have now created their characters. Yes, characters, plural. Since the first session of this game is going to be a full weekend of gaming (my gaming group is 4 states away), we're setting things up to insure a couple of character deaths don't lead to excessive downtime for the players. Here's the full list of characters:
A trio from Gondor:
Mapping

I now have a near complete set of level maps for the entire dungeon. After doing rough drafts of each major level by hand I switched to using Open Office's Impress, which is theoretically presentation software, but does a very nice job of creating flow-chart style maps. Compare my lame rough draft with this close to final version.

Using Impress I've been able to color code a ton of information into the basic map. I can also jump between levels with the application's interactive features, which link slide navigation to mouse-clicks on objects.
I'm still working on naming and tweaking the level maps. I'm also adding at least two more layers of connectivity between the levels: sewers and natural waterways. Other potential links include natural unmapped caves and volcanic vents.
Next steps for mapping include descriptions of the blocked out areas of each level map. I'll be starting this process with the levels most likely to be visited, then work inward from there. The party has a few clues about various entrances into the Mines, so I'll be focusing my efforts on those levels. As I do this I'll also be sketching in sewer lines and waterways, and drawing up unique maps as needed.
Encounters
I've continued sketching out the various groups that currently inhabit the depths of Moria. I now have 20 major groups inhabiting the depths. My biggest challenge now is placing them all in some sort of reasonable fashion. There's a lot of connectivity between the Mine levels and I'm trying to lay out groups so there's some rhyme or reason to it. Some of the recent additions to the bestiary include:
All in all I'm pleased with how Moria is developing, though I find myself spending way too much time thinking about it. I've also discovered I can waste hours tweaking map layouts, something I have to put a stop to if I want to keep moving forward. There's still a ton of work to do, but I love world building, so it's all good!
Characters
All my players have now created their characters. Yes, characters, plural. Since the first session of this game is going to be a full weekend of gaming (my gaming group is 4 states away), we're setting things up to insure a couple of character deaths don't lead to excessive downtime for the players. Here's the full list of characters:
A trio from Gondor:
- 2nd paladin Man of Gondor
- 1st cleric Iron Hills Dwarf
- 1st fighter/magic-user Elf of Lothlorien
- 1st fighter Man of the North
- 2nd cleric Man of Rohan
- 1st thief Man of the North
- 2nd cleric Man of Gondor
- 1st paladin Man of Gondor
- 1st/1st fighter/thief Western Dwarf
- Man of Gondor, Ranger, 2nd Lvl
- Hobbit, Thief, 1st Lvl
- Iron Hills Dwarf, Cleric, 1st Lvl
- Man of the North 2nd level magic user
- Iron Hills Dwarf 1st level cleric
- Elf of Lothlorien - 1st level fighter/magic user
- Iron Hills Dwarf fighter, 2nd level
- Iron Hills Dwarf cleric, 1st level
- Man of the North magic user, 1st level
Mapping


I'm still working on naming and tweaking the level maps. I'm also adding at least two more layers of connectivity between the levels: sewers and natural waterways. Other potential links include natural unmapped caves and volcanic vents.
Next steps for mapping include descriptions of the blocked out areas of each level map. I'll be starting this process with the levels most likely to be visited, then work inward from there. The party has a few clues about various entrances into the Mines, so I'll be focusing my efforts on those levels. As I do this I'll also be sketching in sewer lines and waterways, and drawing up unique maps as needed.
Encounters
I've continued sketching out the various groups that currently inhabit the depths of Moria. I now have 20 major groups inhabiting the depths. My biggest challenge now is placing them all in some sort of reasonable fashion. There's a lot of connectivity between the Mine levels and I'm trying to lay out groups so there's some rhyme or reason to it. Some of the recent additions to the bestiary include:
- A cult of curiously twisted Dwarves who worship at a strange stone altar dedicated to a previously unknown God.
- The reptilian Grimmve, primitive tribal creatures who use living weapons in combat.
- The Ettercap, my own take on the original, half-spider / half-human cross-breeds that serve one of the other groups in Moria.
All in all I'm pleased with how Moria is developing, though I find myself spending way too much time thinking about it. I've also discovered I can waste hours tweaking map layouts, something I have to put a stop to if I want to keep moving forward. There's still a ton of work to do, but I love world building, so it's all good!
Monday, November 16, 2009
Return to Moria: First Victi... err Characters
I thought I'd give a brief update on the status of this campaign setting. I took a few days off after my last significant post on the subject, primarily to let things stew in my head for a while. Since then things have moved forward a bit.
Characters
After I tweaked the available characters and racial level limits a bit, I opened up character creation to the players. Since the group that's going to be playing this is scattered over three states, we do all character creation via email. There are three methods of attribute generation available:
[My players, stop reading!]
Bestiary
I've spent a fair bit of time laying out stat blocks for the various creatures and races inhabiting Moria. When populating a dungeon like this I try to come up with at least three variants of each major inhabitant, and for important races, five or six. I've also laid out the named NPCs found in the dungeon. Using Goblins, as an example, I have the following information:
Dungeon Layout
I've finally settled on how I'm going to map out Moria. The sheer size of the dungeon is rather daunting and I spent some time spinning my wheels as I contemplated how to map the beast. I finally decided to use three detail levels to lay things out.
Hollin
The other thing I've been pushing on is fleshing out the NPCs in Hollin, the starting town outside Moria. I have a pretty good handle on the main NPCs now, and have most of the locals at least sketched out. I used the NPC trait generator from the 1st edition AD&D DMG to fill in some of the blank characters in the NPC list. I've based Hollin's cast on a popular TV series from the recent past so I have a clear picture of how things work in the town. I'll be curious to see if any of my players pick up on the relationship.
Next Steps
That's about where things stand for now. This week I'm planning on finishing out the level maps for Moria, polishing off the last NPCs in Hollin, and starting on some detailed dungeon maps. Stay tuned.
Characters
After I tweaked the available characters and racial level limits a bit, I opened up character creation to the players. Since the group that's going to be playing this is scattered over three states, we do all character creation via email. There are three methods of attribute generation available:
- Pick from a pre-generated list.
- Roll using a 4d6 drop lowest, in order method.
- Roll using a 3d6 best of twelve, choose order method.
- A pair of Iron Hills Dwarves, fighter (2nd) and cleric
- A Man of the North magic-user
- A paladin of Gondor (2nd)
- An Iron Hills Dwarf cleric
- A human cleric (race TBD) (2nd)
- A paladin of Gondor (squire of the other paladin)
- A Western Dwarf fighter/thief with extremely low HP
- A ranger of Gondor (2nd)
- A Hobbit thief
- A lame Dwarf cleric (the only character rolled randomly)
[My players, stop reading!]
Bestiary
I've spent a fair bit of time laying out stat blocks for the various creatures and races inhabiting Moria. When populating a dungeon like this I try to come up with at least three variants of each major inhabitant, and for important races, five or six. I've also laid out the named NPCs found in the dungeon. Using Goblins, as an example, I have the following information:
- Three main tribes, each with three or four important named NPCs.
- Seven variants of basic Goblins (including sneaky, tough, very tough, spell using, and leader types).
- Three creatures that associate with or are used by Goblins.
- Relationships between the Goblin tribes and the various other groups in Moria.
Dungeon Layout
I've finally settled on how I'm going to map out Moria. The sheer size of the dungeon is rather daunting and I spent some time spinning my wheels as I contemplated how to map the beast. I finally decided to use three detail levels to lay things out.
- A top level map. This corresponds to a standard "level layout" map, showing each major area as a simple block diagram. I've altered the maps in the linked post a bit, but they're a good approximation of the top level maps I'm using.
 Level maps. These are block diagrams that show the overall structure of each level in Moria. There's no real detail beyond general connectivity and a note or two for each main area.
- Detail maps. These will be traditional dungeon maps, showing actual corridors, walls, tunnels and features. I plan on doing unique maps for some areas and using generic maps for others.

Hollin
The other thing I've been pushing on is fleshing out the NPCs in Hollin, the starting town outside Moria. I have a pretty good handle on the main NPCs now, and have most of the locals at least sketched out. I used the NPC trait generator from the 1st edition AD&D DMG to fill in some of the blank characters in the NPC list. I've based Hollin's cast on a popular TV series from the recent past so I have a clear picture of how things work in the town. I'll be curious to see if any of my players pick up on the relationship.
Next Steps
That's about where things stand for now. This week I'm planning on finishing out the level maps for Moria, polishing off the last NPCs in Hollin, and starting on some detailed dungeon maps. Stay tuned.
Wednesday, November 11, 2009
Return to Moria: Mushrooms in the Depths
The natural caves and caverns beneath Moria are home to a variety of fungi and mushrooms. Along with the naturally occurring species there are several varieties cultivated by the Dwarves. Some of these fungi are useful, some deadly. Here are a few I'll be using in the campaign:
- Blackspire - These slender, fifteen foot tall, smooth-capped mushrooms have a tough central stalk that the Dwarves used as a construction material. The stalk can be split into long, board-like segments.
- Drowseballs - Thumb-sized, globular puff-balls with a delicate yellow skin and filled with a jelly-like substance. When eaten they instantly cause a deep, uninterpretable sleep that lasts one hour. At the end of the hour the consumer awakens, fully rested and alert as if they had just had a full night's rest.
- Balrog's Flail - This fungus grows from damp stone in clumps of thread-like red-tipped tendrils. It is highly toxic if consumed, but if ground to a paste and combined with alcohol it makes a powerful solvent capable of dissolving iron-based metal.
- Slaver Domes - Tiny pale green mushrooms with a delicious and nutritious sweet flesh, Slaver Domes make anyone that consumes them extremely vulnerable to suggestion or charm effects for four hours (two rank penalty to any resistance checks).
- Red Tongue - This nondescript gray fungus grows on the stems of other fungi, forming broad rounded shelves. It is a nutritious food source, but dyes the tongue of anyone that eats it bright red for hours.
- Clamshell Fungus - A gleaming yellow fungus shaped like a half-shell clam, this growth is poisonous if eaten, but if boiled for an extended period it creates a broth that can neutralize toxins and poisons if consumed. The broth loses potency within a day of its creation.
Saturday, November 7, 2009
Return to Moria: Millstone Doors
These are one of the defensive constructs that will be appearing in Moria:
Defensive doors consisting of a great circle of granite designed to roll in front of a narrow tunnel entrance. The entry is sunken so the stone is held vertically in a trough. It overlaps the frame of the door and can be wedged in place, making it nearly impossible to roll aside from the outside. From the interior it is quite easy to move.
A variant of this door features a narrow hole bored through the center of the stone, allowing a steel rod to be pushed through. One end of the rod features a "T" that unfolds flat against the stone's surface, the other end is held in place with a metal pin. This allows a bar to be fastened across the stone, held in place by the rod and the walls of the tunnel.
The locking version of this door is often used to create cul-de-sac style traps. The enemy is led into a large chamber with multiple looping corridors leading back to the entry area. The pursued party loops through the corridors, exits and seals the door, trapping the pursuers within. Water or poison gas can be used to kill the enemy, or they can simply be left to starve.
Defensive doors consisting of a great circle of granite designed to roll in front of a narrow tunnel entrance. The entry is sunken so the stone is held vertically in a trough. It overlaps the frame of the door and can be wedged in place, making it nearly impossible to roll aside from the outside. From the interior it is quite easy to move.
A variant of this door features a narrow hole bored through the center of the stone, allowing a steel rod to be pushed through. One end of the rod features a "T" that unfolds flat against the stone's surface, the other end is held in place with a metal pin. This allows a bar to be fastened across the stone, held in place by the rod and the walls of the tunnel.
The locking version of this door is often used to create cul-de-sac style traps. The enemy is led into a large chamber with multiple looping corridors leading back to the entry area. The pursued party loops through the corridors, exits and seals the door, trapping the pursuers within. Water or poison gas can be used to kill the enemy, or they can simply be left to starve.
Thursday, November 5, 2009
Return to Moria: Next Steps
In the last article on my Return to Moria campaign, I closed with the intent of focusing this article on setting up the main inhabitants of Moria for the campaign. I quickly discovered that wasn't the only thing I was doing however, so rather than stick to plan, I'm going to write a bit about what I'm really working on (My players keep out!).
At the close of the previous article I had enough in the way of notes and ideas that I needed to get them organized. My go to method of organizing campaign notes these days is Tiddlywiki, a single file wiki implementation that requires no hosting, runs in a browser, and is very easy to use. I use it to write articles for this blog, to maintain a personal to do list, and for campaign notes. If you haven't tried tried Tiddlywiki, I'd urge you to check it out. A couple key features I like:
Once I was organized, I spent some time working on a really rough map of Moria. Moria is gigantic and I've realized I can't map every square inch, so I'm going to be using a mix of graph-style maps that show linkages, geomorph-style maps that I can use to piece together secondary areas, and traditional dungeon maps. With this mix I think I can quickly lay out a reasonable map for any section of the Mines that the players choose to explore.
I also spent some time thinking about how Moria is laid out, and drew a few conclusions based on that. I already talked a bit about the major areas within Moria in the sandbox article, but a few more details emerged:
Organization
At the close of the previous article I had enough in the way of notes and ideas that I needed to get them organized. My go to method of organizing campaign notes these days is Tiddlywiki, a single file wiki implementation that requires no hosting, runs in a browser, and is very easy to use. I use it to write articles for this blog, to maintain a personal to do list, and for campaign notes. If you haven't tried tried Tiddlywiki, I'd urge you to check it out. A couple key features I like:
- Tagging - Any tiddler (Tiddlywiki's term for 'article') can be tagged with one or more terms that serve as categories, making it easy to find things by topic. I have regional (Moria, Hollin, Eregion) tags, category (item, bestiary, location) tags, purpose (encounter, lore, overview), and status (incomplete, published) tags, about 30 in total.
- Inclusion - Any tiddler can be included within another with a one line command. This is extremely useful for encounters as you can include the stat block tiddlers (always written up separately) for all participants in each encounter tiddler without rewriting a bunch of stuff.
- Navigation - You can customize the main navigation bar to reflect your content easily, as the navigation bar is just another tiddler. Moria currently lists the home page article for each major region, plus links to my player site, and a few other external resource sites.
Moria Expanded
Once I was organized, I spent some time working on a really rough map of Moria. Moria is gigantic and I've realized I can't map every square inch, so I'm going to be using a mix of graph-style maps that show linkages, geomorph-style maps that I can use to piece together secondary areas, and traditional dungeon maps. With this mix I think I can quickly lay out a reasonable map for any section of the Mines that the players choose to explore.
I also spent some time thinking about how Moria is laid out, and drew a few conclusions based on that. I already talked a bit about the major areas within Moria in the sandbox article, but a few more details emerged:
- Moria was a city, so there must be places to live and work. I made the decision that Dwarves live in clan halls that house many multi-generational families. This decision allows me to design a few clan hall layouts geomorph style and get a lot of mileage out of them. Similarly, workshops and smithies are clan focused so a similar approach can work there.
- Dwarves are defensive and isolationist. Moria is riddled with defensive fortifications and stonework tricks and traps. Each Hall and Deep can be locked down and isolated from the others and secret tunnels and doors allow flanking maneuvers and troop movements without enemy interference. A combination of geomorph and unique maps will cover these features.
- The Lower Caves are cold and wet. Gandalf hints at this a few times in LotR. I'm going to run with it. The Lower Caves contain vast lakes and rivers of chill black water. With little lore concerning this area, I will take quite a few liberties with the depths.
Occupants
I spent quite a bit of time over the past week sketching out a bestiary for Moria. I've been working in broad strokes, from the known to the unknown. I ended up doing three passes, beginning with what was known about Moria. The first pass gave me the following list:- Goblins, Orcs, Trolls - These are very much evident in LotR and other historic references to Moria so they'll definitely be included. They also make great fodder for more powerful groups, allowing me to set up some internal politics in the Mines.
- Dwarves - By canon, the Dwarves were driven from Moria long ago, but there's no reason to assume they all left. I've sketched out four general groups of Dwarves that remain in Moria:
- Slaves - Some Dwarves were captured and enslaved by Goblins, Orcs or other inhabitants. Their descendants labor on in the dark.
- Survivors - Isolated groups that remained independent or colonies of escaped slaves.
- Turned Dwarves - Cultists, power-mad or overly greedy, these Dwarves aligned themselves to the dark powers found within the depths, becoming hated outcasts.
- Returnees - Dwarves that have returned to reclaim Moria for the Dwarves.
- The Balrog - To my reading it's pretty clear that Gandalf utterly defeated the Balrog, but I'm listing it here just in case I change my mind.
- Watcher in the Water - Gandalf believes this creature was driven from the waters beneath Moria. I'll run with that. There is no longer a lake outside Hollin gate and the Watcher has returned to the depths, but it is not alone.
- Spiders - Shelob is one of my favorite villains in LotR, and spiders appear elsewhere in Tolkien's works, so it seems natural that a lesser daughter of Shelob and some of her spawn will find their way into Moria.
- The Corrupt of Angmar - The realm of the Witch King was defeated long ago, but some of the most powerful and corrupt sorcerers of that evil empire escaped into the deep tunnels and passages beneath the Misty Mountains, eventually finding their way to Moria.
- The Nameless - Gandalf said "Far, far below the deepest delvings of the Dwarves, the world is gnawed by nameless things. Even Sauron knows them not. They are older than he. Now I have walked there, but I will bring no report to darken the light of day." Yeah, gotta use that.
- Khazad-azun - Dwarf cultists who worship The Nameless as Gods, a faith shared by...
- The Deep Ones - Foul aquatic beings of the Lower Caves, minions of The Nameless. With the fall of the Balrog they are free to expand their realm.
- Herders - As the Ents watch over the great forests of Middle-earth so do the Herders watch over the fungal woods and their inhabitants in the depths.
- Minions of the Corrupt - The dark magic of Angmar perverts flesh and mind to its purpose. Bestial Weres, demonic Imps, stony Gargoyles and spidery Ettercaps serve the sorcerers of the dead Witch King.
- Golems - Some of the automatons of the Dwarves remain active in the Halls and Deeps of Moria, forever executing their last commands to work or protect the Mines.
- The Aquatics - The Nameless and the Deep Ones are not the only creatures inhabiting the Lower Caves, the Beingreip and Grimmve, hard-shelled and scaly, also lurk in the depths.
Saturday, October 31, 2009
Return To Moria: Some Maps
These are two quick maps I pulled together for my Moria campaign using Open Office Draw to lay them out. Note to my players: Don't be peeking!
They show the main upper halls, the lower deeps, the two gates into the Mines, a number of upper and lower natural cavern complexes, and Durin's Tower, with a few miscellaneous markers up too.
The first one is a top-down view of the main areas of Moria.

The second is a side view showing relative elevations.

Of course there's no real scale here, other than a rough 40 miles between the gates.
They show the main upper halls, the lower deeps, the two gates into the Mines, a number of upper and lower natural cavern complexes, and Durin's Tower, with a few miscellaneous markers up too.
The first one is a top-down view of the main areas of Moria.

The second is a side view showing relative elevations.

Wednesday, October 28, 2009
Return To Moria: The Sandbox
A while back I posted the pitch I made to my gaming group. The response from my players was overwhelmingly positive, so the game is afoot. Since mega-dungeons and sandbox play are recurring threads in the blog-sphere and that's the direction I'm taking with this game I thought I'd throw down some information about how I'm preparing for this game.
Since the game is set in Tolkien's Middle-earth, my first step was to find some inspirational resources. A quick web search turned up two sites that look useful, The Encyclopedia of Arda and The Thain's Book. I also spent the weekend watching the The Lord of the Rings .
.
My next step was to define the potential roles for player characters. Tolkien's world provides many options for races and backgrounds, but doesn't really fit the classic old-school class model very well, but I've already decided to play fast and loose with the setting, so coming up with a collection of races and classes wasn't all that hard.
My initial pitch sketched out the very basic outlines of the sandbox, so my next step was to firm up the area of play. I had visualized Hollin, the player's base of operations, as a gold rush town, populated by those drawn by the potential wealth of Moria. With that in mind I laid out a list of businesses:
The next step was to lay out an overview of Moria. Moria is a huge place, something like 40 miles east to west, so a broad strokes layout is going to be very helpful in planning who or what lives where. Clearly laying out 40 miles of dungeons a grid at a time is the work of a lifetime, so I needed a framework to hang the important bits on. I did a little digging into the history of the Dwarves and discovered the number seven has some significance to them (seven Dwarf clans, seven rings of power), so I decided to play up that theme. Moria, I decided, was made up of seven Great Upper Halls, cut into the slopes of Silvertine. Twenty-one Great Deeps (seven times seven [edit: clearly my math is flawed]) were cut beneath the mountain's roots and housed the mines, armories, and workshops of Moria. I also picked out some of the major features of Moria mentioned by Tolkien, Durin's Tower, the Endless Stair, Dimrill Gate, the Bridge at Khazad-dum, and added them to the list. I then did a very rough layout of these levels on paper.
So far so good, but all those levels are carved by Dwarves. I wanted a little more variety, so I defined a few different areas as well:
At this point I have a pretty good idea of how things are laid out in and around Moria:
My next steps are going to be focused on the occupants and features of Moria proper, but that's fodder for the next article.
Since the game is set in Tolkien's Middle-earth, my first step was to find some inspirational resources. A quick web search turned up two sites that look useful, The Encyclopedia of Arda and The Thain's Book. I also spent the weekend watching the The Lord of the Rings
.My next step was to define the potential roles for player characters. Tolkien's world provides many options for races and backgrounds, but doesn't really fit the classic old-school class model very well, but I've already decided to play fast and loose with the setting, so coming up with a collection of races and classes wasn't all that hard.
My initial pitch sketched out the very basic outlines of the sandbox, so my next step was to firm up the area of play. I had visualized Hollin, the player's base of operations, as a gold rush town, populated by those drawn by the potential wealth of Moria. With that in mind I laid out a list of businesses:
- Durin's Rest - A slightly better quality inn and tavern
- Farin's Provisions - General supplies and provisions
- Gamling's Mounts - A stable
- Garden of the Valar - Shrines to the various Valar
- Mithril's End - A smithy
- Moria Tours - Guided tours of Moria
- Sheriff's Office - The local law enforcement
- The Common - The open central square of the village, generally a muddy morass
- The Dancing Dwarf - A tavern, brothel, casino and inn, all rolled into one
- The Market - A bazaar held outside the palisade three days a week
The next step was to lay out an overview of Moria. Moria is a huge place, something like 40 miles east to west, so a broad strokes layout is going to be very helpful in planning who or what lives where. Clearly laying out 40 miles of dungeons a grid at a time is the work of a lifetime, so I needed a framework to hang the important bits on. I did a little digging into the history of the Dwarves and discovered the number seven has some significance to them (seven Dwarf clans, seven rings of power), so I decided to play up that theme. Moria, I decided, was made up of seven Great Upper Halls, cut into the slopes of Silvertine. Twenty-one Great Deeps (seven times seven [edit: clearly my math is flawed]) were cut beneath the mountain's roots and housed the mines, armories, and workshops of Moria. I also picked out some of the major features of Moria mentioned by Tolkien, Durin's Tower, the Endless Stair, Dimrill Gate, the Bridge at Khazad-dum, and added them to the list. I then did a very rough layout of these levels on paper.
So far so good, but all those levels are carved by Dwarves. I wanted a little more variety, so I defined a few different areas as well:
- The Upper Caves - natural caverns that honeycomb the slopes of Silvertine.
- The Lower Caves - lightless caverns deep beneath the Dwarven diggings inhabited by creatures even Gandalf didn't understand.
- The Black Reaches - Caverns tainted by the foul presence of the Balrog.
At this point I have a pretty good idea of how things are laid out in and around Moria:
- I have thumbnail descriptions of the important businesses and points of interest in Hollin
- I've written a line or two about most of the named NPCs in Hollin.
- I have the general layout of Moria in place, and have solved the "how to get in" problem.
- I've also accumulated some rough notes about who or what might be found in Moria.
My next steps are going to be focused on the occupants and features of Moria proper, but that's fodder for the next article.
Friday, October 23, 2009
Return to Moria: Player Races
A couple days ago I posted up the pitch I offered my regular gaming group for one of our mega-weekend gaming sessions. It met with much enthusiasm, so it looks like we'll be playing Return to Moria soon. Time to start planning! Here's the race and class combinations we're probably going to be using. I wanted to give things a Tolkienesque feel without deviating too far from old school D&D.
Races / Classes
Potential class and race combinations listed below. These are tentative at this point. Maximum levels possible for each race/class combination are listed in parenthesis where appropriate.Iron Hills Dwarf
Representatives of the Iron Hill Dwarfs. Dain's kinsmen are fascinated with Moria and expeditions from the Iron Hills are quite common. Unfortunately, like Balin's original foray, they have ended in failure.- Classes: Cleric (8), Fighter (9)
- Multi-class: Cleric/Fighter
- Bonuses: Dwarf racial bonuses, Lore of the Dwarfs
Western Dwarf
Often scorned by their more noble cousins, the Western Dwarfs represent the scattered clans inhabiting hills and valleys west of the Misty Mountains. They are a less reputable class of Dwarf, though they are just as greedy as their distinguished cousins.- Classes: Fighter (9), Thief (8)
- Multi-class: Fighter/Thief
- Bonuses: Dwarf racial bonuses, +5% Hide in Shadows, Move Silently
Elf of Mirkwood
Elves rarely have anything to do with the works of Dwarfs and Men, but King Thranduil has a streak of avarice larger than most of his kind, so he encourages the boldest among his folk to join the exploration of Moria.- Classes: Druid (7), Fighter (7)
- Multi-class: N/A
- Bonuses: Elf racial bonuses, speak with animals 1/day
Elf of Lothlorien
Since the fall of Sauron, most of the inhabitants of Lothlorien sailed into the West. Those that remain are seemingly lost in a world that has left them behind, lost in a dream of past glories. Some of these Elves still seek to oppose the darkness left by Sauron's fall, and some of the Elves in Hollin fall into this group.- Classes: Fighter (7), Magic User (11), Ranger (7)
- Multi-class: Fighter/Magic User
- Bonuses: Elf racial bonuses, detect evil 1/day
Half-Elven of Rivendell
Though their leader Elrond has departed Middle-Earth, many of his kindred, loyal to Arwen and the new king in Gondor, remained behind. The adventuresome among their ranks are sometimes found in Hollin, seeking their fortunes and pursuing the hated Orcs that dwell beneath the Misty Mountains.- Classes: Druid (7), Fighter (7), Magic User (11), Ranger (7)
- Multi-class: Druid/Ranger, Fighter/Magic User
- Bonuses: Half-elf racial bonuses, Lore of the Elves
Man of Gondor
The power of Gondor is on the rise, but not all are content with the peace. The bold, the discontent, the greedy, and the adventurous souls of Gondor are drawn to Moria, seeking glory, riches and power.- Classes: Cleric, Fighter, Magic User, Paladin, Ranger
- Multi-class: N/A
- Bonuses: Family Heirloom, Lore of Men
Man of Rohan
The fury of the Rohirrim, guided and channeled by Lord Eomer, still burns. The Riders of Rohan pursue the foul remnants of Sauron's army wherever it hides. Though unused to the deeps of Moria, the Rohirrim have come to see pursuit of their hated enemies in the depths as a test of manhood.- Classes: Cleric, Fighter, Ranger
- Multi-class:N/A
- Bonuses: Mount, Free weapon proficiency
Man of the North
The Men of the North receive undue scorn from the noble Men of Gondor. They are the Northmen and Dunlendings. Lesser men, perhaps, than the noble line of Gondor, but Men with the same desires as their betters, wealth, power and fame.- Classes: Fighter, Magic User, Thief
- Multi-class: N/A
- Bonuses: 2d6x10 extra gold, A map
Hobbit
Rare is the Shireling that makes the journey to Hollin, but other Hobbits of less renowned communities do show up from time to time. Like all Hobbits, they place comfort and food first, but some desire something more.- Classes: Fighter (6), Thief
- Multi-class: Fighter/Thief
- Bonuses: Hobbit racial bonuses, 8 weeks rations
Wednesday, October 21, 2009
Return to Moria: The Pitch
This is the pitch I sent out to my group of regulars for our next mega-weekend game. Let's see who's foolish enough to sign up...
Return to Moria
Sauron is dead. Aragorn is king. Gandalf and his pals have sailed away. Ten years have passed since the One Ring was destroyed. The world has become a brighter place and the time of Men is at hand. Time for the valiant fighters, professional treasure seekers, greedy dwarfs and haughty elves to come forth.
Sauron's dark armies were scattered when the Ring was destroyed, but they didn't vanish. Instead they returned to the dark places beneath Middle Earth. Now, like a siren's song, the hidden wealth of Moria calls to the adventurous, the brave, the greedy and the foolhardy.
What it is:
Return to Moria will be an old school dungeon romp loosely (*very* loosely) based on Middle Earth. No complicated back story or deep preparation required (10' poles and torches suggested). I haven't made a final determination as to rules, but some potential candidates are:
Going back to basics for ease of character creation and less setup time. Also Dwarfs and Elves as classes! S&W and LL will be completely familiar to any D&D player.
Rough notes:
Characters will be based in the small town of Hollin that's sprung up west of the Misty Mountains in Eregion. There will be a tavern, a smithy, a general store, and a temple. There might be thieves and wealthy patrons funding expeditions into Moria too.
The mountains are dangerous, with various nasty creatures opening new entrances to / from Moria and waylaying travelers and explorers.
Your job: Get rich. Survive.
Return to Moria
Sauron is dead. Aragorn is king. Gandalf and his pals have sailed away. Ten years have passed since the One Ring was destroyed. The world has become a brighter place and the time of Men is at hand. Time for the valiant fighters, professional treasure seekers, greedy dwarfs and haughty elves to come forth.
Sauron's dark armies were scattered when the Ring was destroyed, but they didn't vanish. Instead they returned to the dark places beneath Middle Earth. Now, like a siren's song, the hidden wealth of Moria calls to the adventurous, the brave, the greedy and the foolhardy.
What it is:
Return to Moria will be an old school dungeon romp loosely (*very* loosely) based on Middle Earth. No complicated back story or deep preparation required (10' poles and torches suggested). I haven't made a final determination as to rules, but some potential candidates are:
- 1st edition AD&D - classic standby
- Swords & Wizardry - free retro-clone of original white box D&D
- Labyrinth Lord - free retro-clone of original basic/expert D&D
Going back to basics for ease of character creation and less setup time. Also Dwarfs and Elves as classes! S&W and LL will be completely familiar to any D&D player.
Rough notes:
- Everyone starts with 3 characters (1 2nd, 2 1st). There will be blood. Expect deaths.
- Old school XP (kills and gold) with accelerated advancement.
- Dungeon delving with the usual assortment of monsters, traps and tricks.
- Did I mention the death part?
Characters will be based in the small town of Hollin that's sprung up west of the Misty Mountains in Eregion. There will be a tavern, a smithy, a general store, and a temple. There might be thieves and wealthy patrons funding expeditions into Moria too.
The mountains are dangerous, with various nasty creatures opening new entrances to / from Moria and waylaying travelers and explorers.
Your job: Get rich. Survive.
Subscribe to:
Posts (Atom)